Setup a Notification or Alert (New and Legacy) 
Notifications are a valuable mechanism to help keep you informed about events or alarms associated with your assets.
The option to create, setup, or edit notifications is available from many pages throughout the platform.
-
Where available, click
(Notification Setup). For example, from Live Map > Asset Dashboard > Actions drop-down menu > Notification Setup. The Notification Setup screen appears showing any existing notifications. -
From this screen, you can
-
Add a new notification or add a new legacy notification.
-
Delete an existing notification by clicking
 (delete) in the Actions column for the notification you want to delete.
NOTE: If the Actions column is not visible, you may need to set it to show by clicking  .
.NOTE: Only an administrator or owner of the alert has the ability to delete the alert. -
View details about existing notifications by hovering over the name of any existing notification to see its details, or by clicking an existing notification name to edit its details.
-
Add or Create a New Notification or Alert
-
From the Notification Setup or Alert Management screen (
available from several locations within the platform), click Add New or refer to Add a New (Legacy). -
At the top of the Add New Alert wizard, type a name for the alert.
-
On the Details tab, select a When to notify option from the drop-down menu. By default, the current user appears as the Owner of the alert.
-
On every message till condition lasts
-
Only once on condition detection
-
On detection and clear of condition
-
-
On the Details tab of the Add New Alert wizard, select an Alert Type from the drop-down menu and set the required values / parameters.
Alert Type
Parameter
Value
Comment
2-Way Command Status Trigger On
Completed
FailedSpecify if alert is triggered upon 2-way command completion, failure, or both.
Device / Asset Pairing n/a - Notification is triggered each time a device is paired with an asset. Alert Type
Parameter
Value
Comment
Geofence Arrival / Departure Trigger On
Arrival
DepartureIndicate if the alert is triggered when entering or exiting the geofence.
Geofences
Select from a list of geofences and geofence groups.
-
Alert Type
Parameter
Value
Comment
Low Fuel Level Fuel Level
%
The fuel level below which the alert is triggered.
Location
Anywhere
Inside Geofence
Outside Geofence-
Low / Critical Battery Battery Level
Low
Critical
Specify VoltageThe battery level below which the alert is triggered.
PT 6000 / RT 6000 12.0 V (low), 11.8 (critical)
GT 1020 / GT 1030 3.5 V (low)
GT 1100 / GT 12xx 6.9 V (low)Specify Voltage allows you to manually enter a voltage value.
Location
Anywhere
Inside Geofence
Outside Geofence-
Alert Type
Parameter
Value
Comment
Reefer Alarms Refrigeration Unit
Select from a list of units to monitor
Can select All Units, select a single unit, or multiple units.
Alarms Select from an extensive list of alarms
The alarms that trigger an alert. Can select one or multiple alarms. Location
Anywhere
Inside Geofence
Outside Geofence-
Temperature Out of Range with Sensor Identifies when a trailer temperature is outside of the user defined limits for a given period. Sensor
Select from a list of zones and probes to monitor
-
Range Type
Use zone setpoint
Enter fixed temperatureSpecify the setpoint zone, and the upper and lower setpoint range value.
Set the number of minutes the setpoint can be out of range or indicate to only monitor if the doors are closed.
Set the monitoring delay.
Location
Anywhere
Inside Geofence
Outside Geofence-
-
Click Next.
-
On the Assets tab, select one or more assets from the drop-down list.
NOTE: Assets / groups are not selectable from the list if they do not pertain to the alert type selected. -
Click Next.
-
On the Content & Recipients tab, use the drop-down list to select the email recipients to notify and / or recipients to receive text notifications. In the Additional Content section, click all the options you want included in the alert. These details, (for example, Acitve Alarms or Arrival Time) are added to the email notification.
NOTE: You can manually type an email address or phone number for recipients who do not have a user profile in the account. NOTE: Add new recipients by creating new user profiles. -
Click Next.
-
On the Schedule tab, indicate when recipients should receive the alerts.
NOTE: Recipients only receive alerts for the days and times specified. Recipients are NOT notified if an alarm is triggered outside of this schedule. 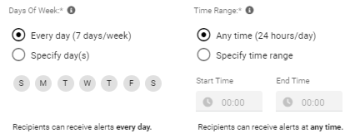
-
Click Next.
-
On the Summary tab, review all the alert information you specified, and then click Create. The new notification appears on the Notification Setup screen.
Click Edit if you need to make a change to any of the information, and then click Next until you return to the Summary tab.
Add or Create a New (Legacy) Notification or Alert
-
From the Notification Setup screen or the Alert Management page, click
 , and then select Add a New (Legacy) or refer to Add New.
 -
Type a Notification Name, use the drop-down menu to specify when to notify, and select an asset type from the drop-down list.
When to Notify On every message until the condition lasts Only once on condition detection On detection and clear of condition Asset Type Any All Dry Vans All Reefers In the Alert Condition section, from the drop-down menus, specify an alert method and an alert type.
Alert Method Quick Setup Allows you to select from pre-configured notifications, removing the need to create custom triggering events.
Message Type Allows you to select from a list of message types the specific ORBCOMM device can send, which then triggers a notification if the event occurs.
Custom Allows you to create very specific alerts based on multiple criteria.
If you select this option, you can modify Message, Asset, Location, and Temperature. For all other customization, contact ORBCOMM Customer Care.These Alert Types apply when the Alert Method is Quick Setup
Alert Types
Description
Details
Ambient Temperature Alerts
Monitor if the ambient temperature goes above the set value.
Set a greater than or less than temperature value.
Asset at Geofence for too long
Monitors if an associated asset is within the geofence of a selected location.
Choose the time period that the specified asset must exceed before an alert is sent.
Door Opened Alerts Monitors if an asset's door sensor is triggered outside of a selected schedule. Triggers a door open alert for an asset when the door is open, and the asset is outside of a geofence.
Dwell Hours Alerts
Monitors if the asset exceeds the specified dwell time.
Set the dwell duration greater than time.
Fridge Off Alarms Monitors for fridge Off events. - FTA Change Alerts
FSMA Temperature Alerts monitor assets that do not reach a specified temperature threshold within a set amount of time.
Specify three FTA Status settings. Among the options are FTA Reefer OFF, FTA Precool In Progress, and many more.
Micro Disconnect Alert
This alert indicates a loss of communication between the device and the microprocesor.
This alert often indicates that a local inspection of the asset is required. If the device is disconnected, a battery disconnect event is generally sent.
Mileage Threshold Alert
Monitor if the asset exceeds the specified distance.
Specify the greater than distance.
Movement Out of Hours Monitors if an asset moves outside of a defined schedule. Set a speed threshold that the asset must break to trigger the alert. Offline Recorder Alert (Account Level)
Monitor if the recorder exceeds the offline threshold set.
Set the greater than threshold for offline time.
Power Change Alert
Monitors if the power changes.
-
Rapid Fuel Loss / Rapid Fuel Change Alert
Monitors when fuel level drops or changes.
Indicate the value to difference to monitor (fuel difference is greater than X).
Reefer Alarms
Monitors alarms received from the microprocessor of a reefer.
Select an active alarm as shutdown, warning, info, or all
Select an alarm from an extensive list of pre-configured alarms.Reefer Alerts
Monitors alerts received from a reefer.
-
Return Temperature Alert
Monitor whether the selected return goes above or below the temperature value provided.
Indicate which return to monitor and whether the temperature should be less than or greater than the temperature value provided.
Run Hours Threshold
Monitors when the engine run hours exceed the defined threshold.
Indicate whether to use default values or set the thresholds for at least one of Engine Hours, Switch On Hours, or Standby Hours.
Unscheduled Door Opening
Monitor is the door is opened outside of the set schedule.
Specify the door to monitor (Any Door, Door 1 to Door 3).
Specify whether to monitor on door open or door close.
Specify to monitor on Any Geofence Status, Inside Geofence, or Outside Geofence.When the Alert Method is Message Type, there is an extensive list of Alert Types.
-
In the Assets & Geofences section, from the drop-down menus, specify Assets / Asset Groups you want the alarm condition to monitor and one or more Geofences / Geofence Groups.
-
In the Monitoring Schedule section, specify the days of the week and time interval to send the notification message.
-
In the Content and Recipients section, specify and additional content you want to include in the notification and details about the recipients.
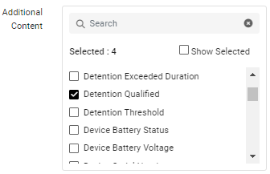
Select one or more additional content details you want added to the notification. Selected: keeps track of the number of items checked, and choosing Show Selected displays only the selected items (in this example, would display only the four selected items). Recipient Emails Choose one or more contacts from the list that you want to notify by email. You can type the email address for any recipient who does not have a user profile in the account. Phone Numbers Choose one or more contact phone numbers from the list that you want to notify by phone. You can type the phone number for any recipient who does not have a user profile in the account. -
Click Save. The new notification appears on the Notification Setup screen.